> ## Documentation Index
> Fetch the complete documentation index at: https://docs.nxtjob.ai/llms.txt
> Use this file to discover all available pages before exploring further.
# Builder Interface
> Master the Resume Builder's toolbar, templates, sections, style, and download options
## What Is the Resume Builder?
The Resume Builder is the core editing environment where you craft, refine, and optimize your resume. It combines a document editor, a formatting toolbar, and real-time scoring into a single workspace. When you open any resume for editing, you arrive at a URL like `resume.nxtjob.ai/{resume-id}?tab=score`.
The builder is designed so that every change you make -- whether adjusting a template, rearranging sections, or tweaking font sizes -- is reflected instantly in the live preview on the left side of the screen.
## What Can I Do with the Resume Builder?
From the builder interface you can:
* Edit every section of your resume with inline formatting (bold, italic, links)
* Switch between professionally designed templates without losing content
* Add, remove, and reorder resume sections
* Customize fonts, colors, and spacing
* Download your resume as a PDF or share it via a public link
* View your Resume Score and ATS Score in the right-hand panel
* Use AI-powered content generation for any section
## How Do I Start Editing a Resume?
Navigate to [resume.nxtjob.ai](https://resume.nxtjob.ai) and sign in. You will land on the **My Resumes** dashboard at `resume.nxtjob.ai/all`.
Click the **pencil icon** on any resume card, or click the **three-dot menu** and select **Edit**. If you do not have a resume yet, click **+ Create New** to create one.
The builder opens with the resume preview on the left and the scoring panel on the right. The top toolbar gives you access to Templates, Sections, Style, and Download.
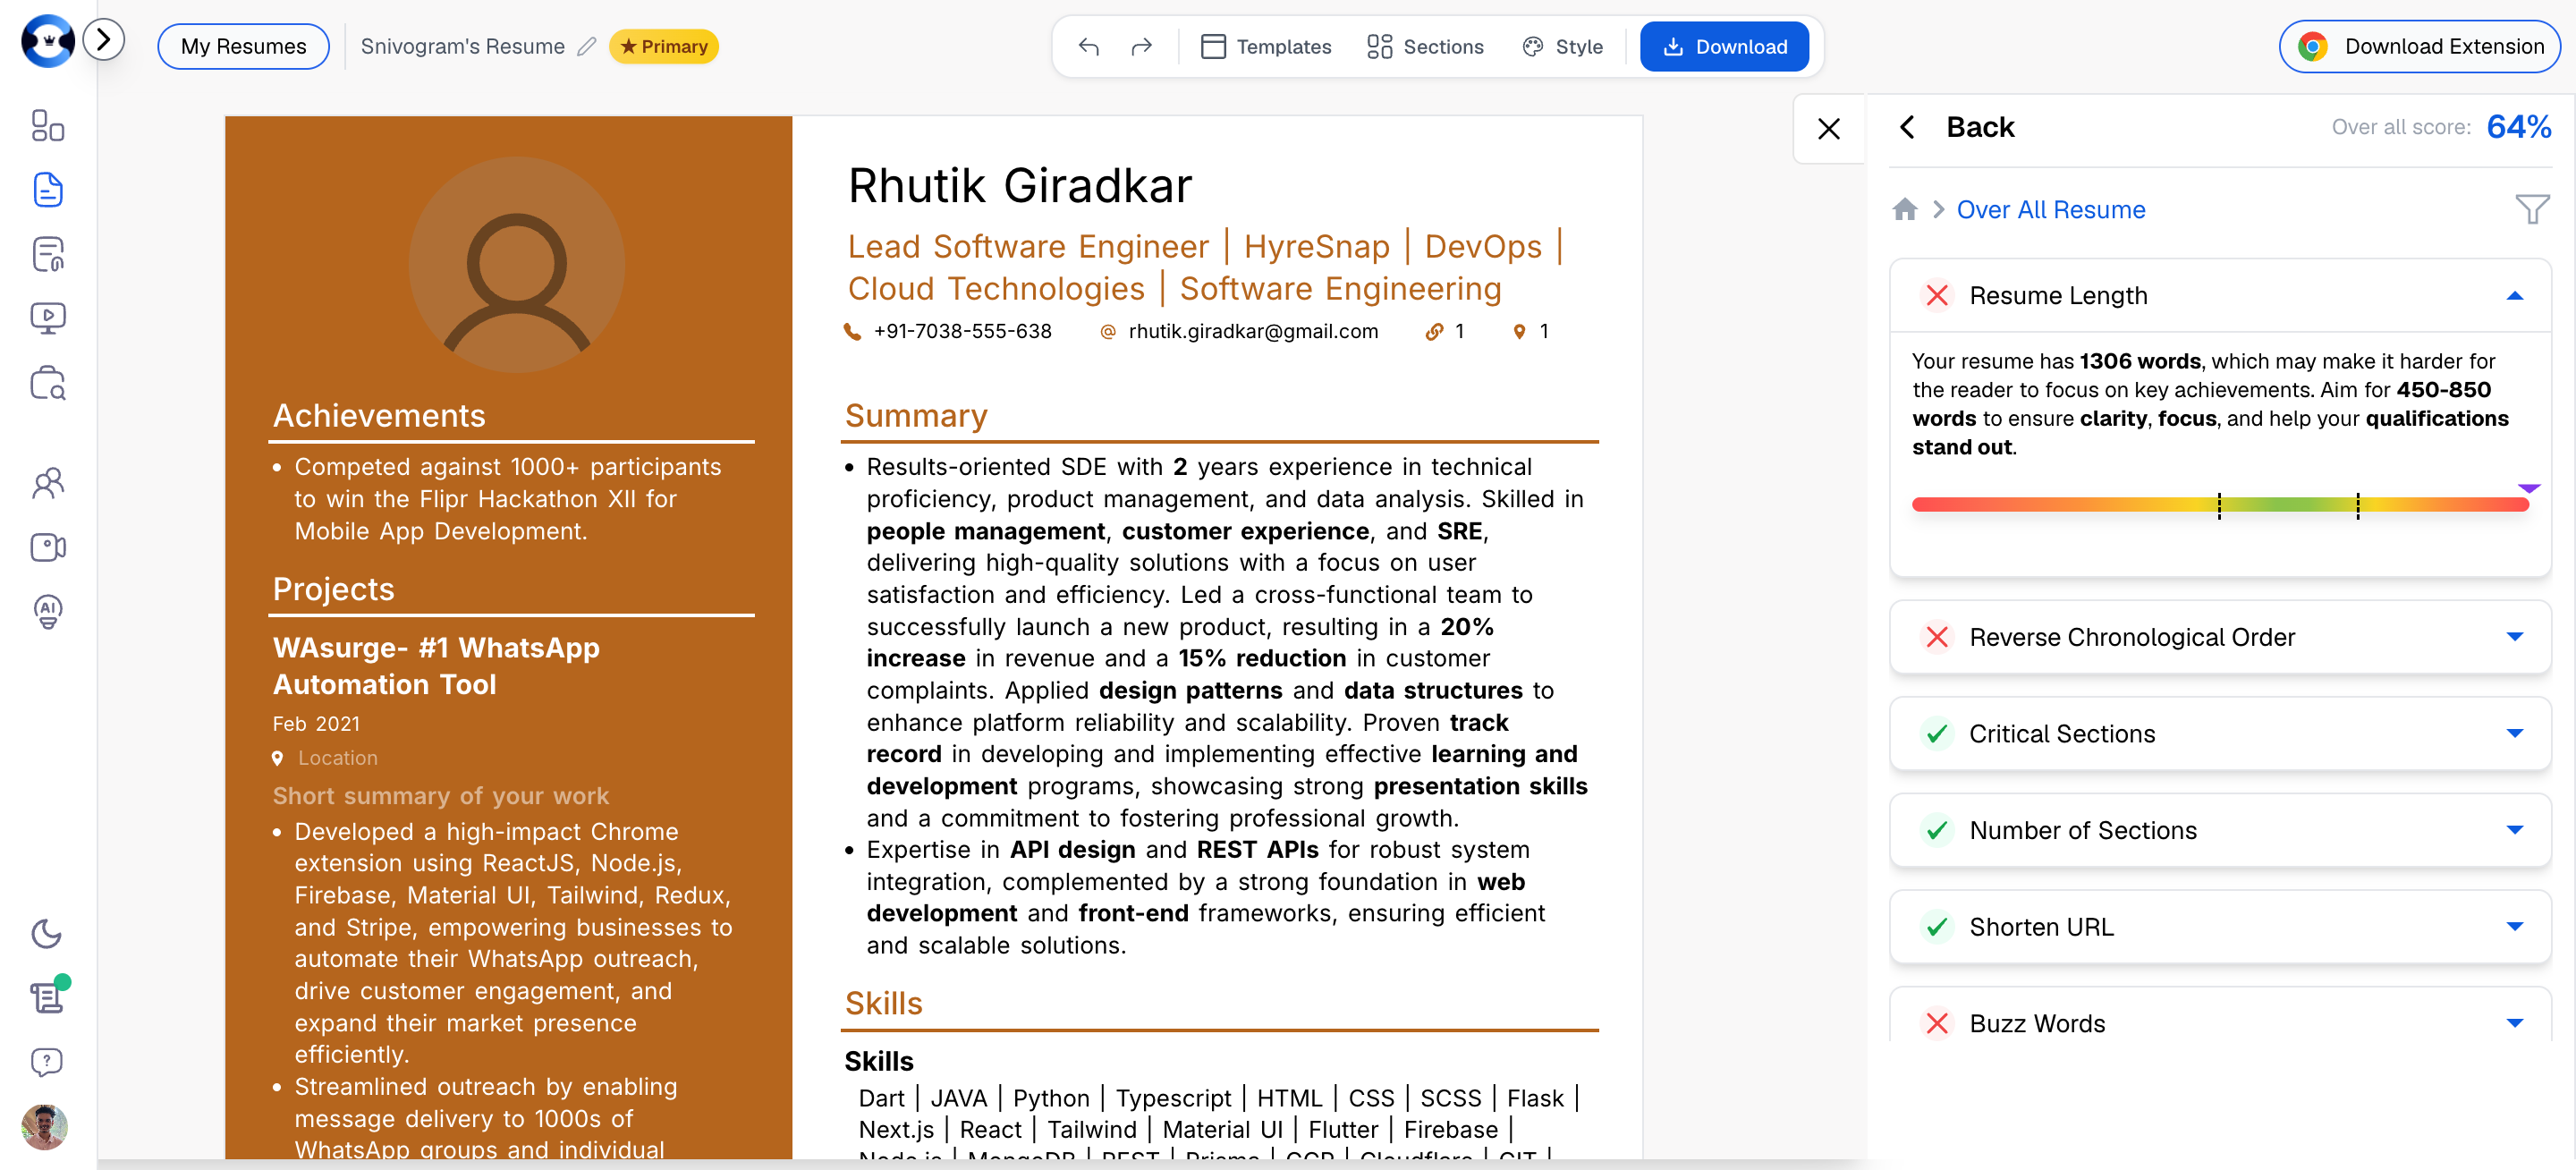 The interface is divided into three main areas:
1. **Top Toolbar** -- Controls for resume name, undo/redo, Templates, Sections, Style, and Download.
2. **Left Panel (Editor)** -- The full resume document with editable sections, inline formatting, and page break indicators.
3. **Right Panel (Score and Optimization)** -- The scoring panel with Resume Score and ATS Score tabs, plus the full optimization breakdown.
***
## Top Navigation Options
The top toolbar spans the full width of the builder and provides quick access to the most frequently used controls. Every action you need for formatting, organizing, and exporting your resume lives here.
The interface is divided into three main areas:
1. **Top Toolbar** -- Controls for resume name, undo/redo, Templates, Sections, Style, and Download.
2. **Left Panel (Editor)** -- The full resume document with editable sections, inline formatting, and page break indicators.
3. **Right Panel (Score and Optimization)** -- The scoring panel with Resume Score and ATS Score tabs, plus the full optimization breakdown.
***
## Top Navigation Options
The top toolbar spans the full width of the builder and provides quick access to the most frequently used controls. Every action you need for formatting, organizing, and exporting your resume lives here.
 ### Resume Name and Version
Your resume name is displayed in the top-left area of the toolbar. If the resume has been marked as your primary document, a blue **Primary** badge appears next to the name.
**How to view the resume name:**
The name is always visible in the top toolbar while you are editing. It matches the title you see on the resume card in your dashboard.
**How to rename a resume:**
Return to the **My Resumes** dashboard at `resume.nxtjob.ai/all`.
Click the **three-dot (...)** icon on the resume card you want to rename.
Choose **Rename** from the dropdown menu. A dialog appears where you can type the new name.
Confirm your new name. The updated title will appear on the resume card and in the builder toolbar the next time you open it.
Use a consistent naming convention such as `[Role] - [Company] - [Month Year]` (for example, "Senior Backend Engineer - Stripe - Feb 2026"). This makes search and identification much easier when you build up a large resume library.
### Undo and Redo
The undo and redo buttons sit in the top toolbar, represented by left-arrow and right-arrow icons.
**How to undo changes:**
Click the **Undo** button (left-arrow icon) in the top toolbar, or use the keyboard shortcut **Ctrl+Z** (Windows/Linux) or **Cmd+Z** (Mac). Each click steps back one action.
**How to redo changes:**
Click the **Redo** button (right-arrow icon) in the top toolbar, or use the keyboard shortcut **Ctrl+Y** (Windows/Linux) or **Cmd+Shift+Z** (Mac). Each click restores one undone action.
**What actions can be undone or redone?**
| Action Type | Can Be Undone? |
| ----------------------------------------- | -------------- |
| Text edits (typing, deleting, formatting) | Yes |
| Section reordering | Yes |
| Adding or removing a section | Yes |
| Template switching | Yes |
| Style changes (font, color, spacing) | Yes |
If you are experimenting with different templates or layouts, undo is your safety net. Try any change freely -- you can always step back to the previous state.
***
## Templates
Templates control the visual layout and structure of your resume. Changing a template reformats your content into a new design without losing any data. Your text, sections, and settings all carry over.
Click the **Templates** tab in the top toolbar to open the templates panel.
### Resume Name and Version
Your resume name is displayed in the top-left area of the toolbar. If the resume has been marked as your primary document, a blue **Primary** badge appears next to the name.
**How to view the resume name:**
The name is always visible in the top toolbar while you are editing. It matches the title you see on the resume card in your dashboard.
**How to rename a resume:**
Return to the **My Resumes** dashboard at `resume.nxtjob.ai/all`.
Click the **three-dot (...)** icon on the resume card you want to rename.
Choose **Rename** from the dropdown menu. A dialog appears where you can type the new name.
Confirm your new name. The updated title will appear on the resume card and in the builder toolbar the next time you open it.
Use a consistent naming convention such as `[Role] - [Company] - [Month Year]` (for example, "Senior Backend Engineer - Stripe - Feb 2026"). This makes search and identification much easier when you build up a large resume library.
### Undo and Redo
The undo and redo buttons sit in the top toolbar, represented by left-arrow and right-arrow icons.
**How to undo changes:**
Click the **Undo** button (left-arrow icon) in the top toolbar, or use the keyboard shortcut **Ctrl+Z** (Windows/Linux) or **Cmd+Z** (Mac). Each click steps back one action.
**How to redo changes:**
Click the **Redo** button (right-arrow icon) in the top toolbar, or use the keyboard shortcut **Ctrl+Y** (Windows/Linux) or **Cmd+Shift+Z** (Mac). Each click restores one undone action.
**What actions can be undone or redone?**
| Action Type | Can Be Undone? |
| ----------------------------------------- | -------------- |
| Text edits (typing, deleting, formatting) | Yes |
| Section reordering | Yes |
| Adding or removing a section | Yes |
| Template switching | Yes |
| Style changes (font, color, spacing) | Yes |
If you are experimenting with different templates or layouts, undo is your safety net. Try any change freely -- you can always step back to the previous state.
***
## Templates
Templates control the visual layout and structure of your resume. Changing a template reformats your content into a new design without losing any data. Your text, sections, and settings all carry over.
Click the **Templates** tab in the top toolbar to open the templates panel.
 ### What Resume Templates Are Available?
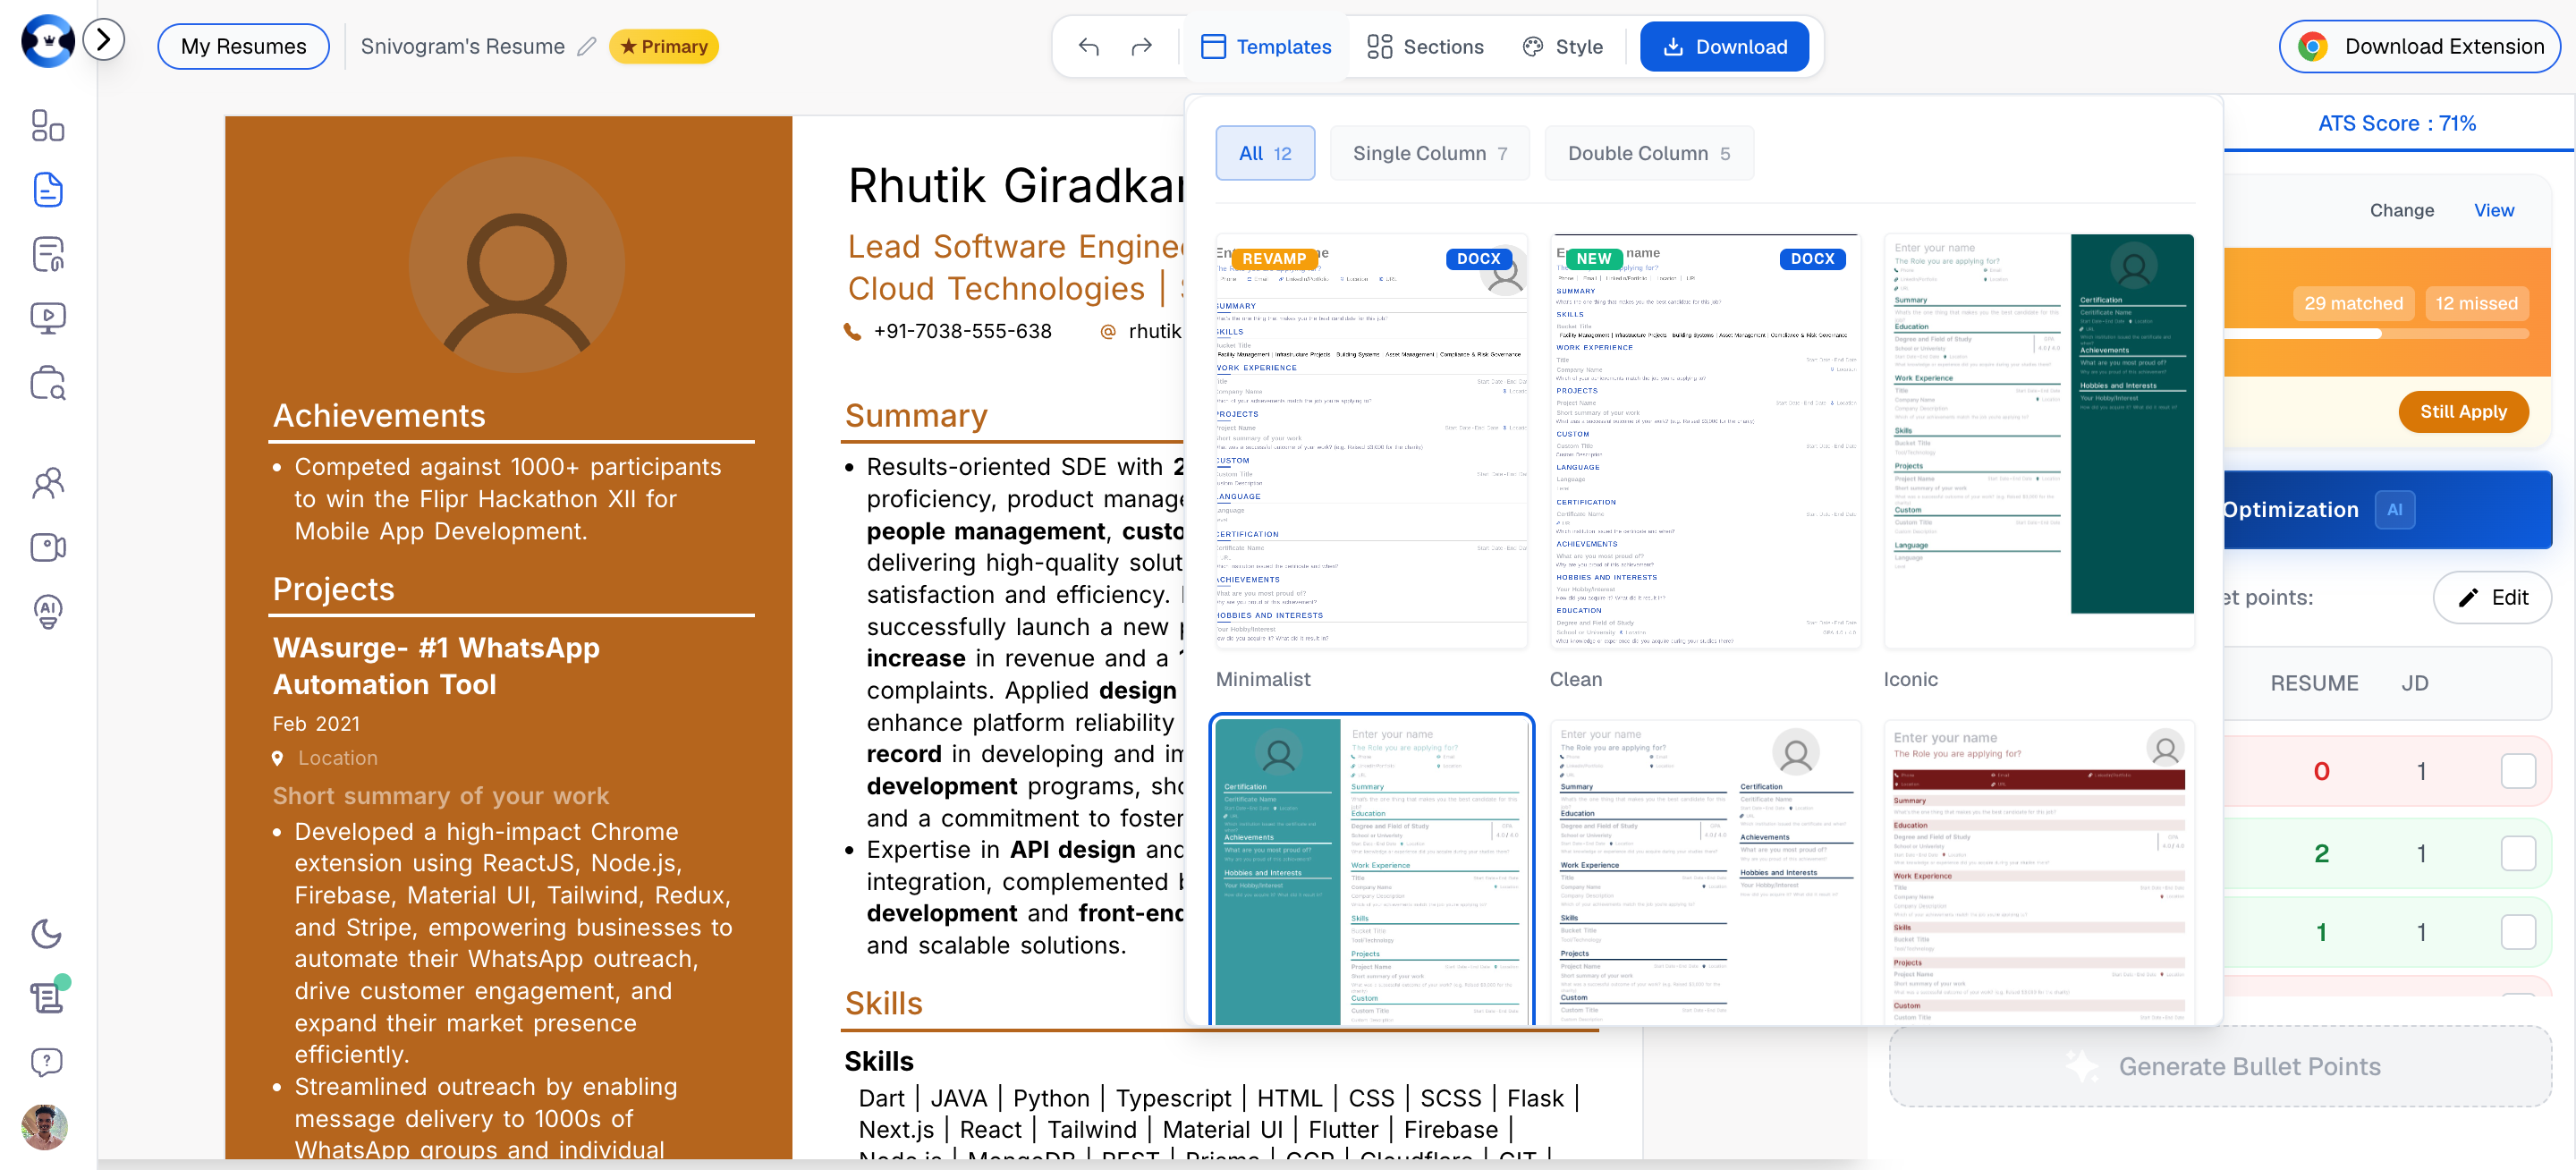
NxtJob offers **12 professionally designed templates** organized into two categories:
| Category | Count | Description |
| ----------------- | ----- | --------------------------------------------------------------------------------------------------- |
| **Single Column** | 7 | Content flows in one column from top to bottom. Clean, linear reading order. |
| **Double Column** | 5 | Content is split into two columns, typically with a sidebar for skills, contact info, or education. |
You can browse all 12 at once using the **All** tab, or filter by **Single Column** or **Double Column** using the tabs at the top of the templates panel.
### What Is the Difference Between Single-Column and Double-Column Templates?
**Single-column templates** present your resume content in a single, top-to-bottom flow. Every section occupies the full width of the page. This creates a straightforward reading experience that mirrors how most people scan documents: left to right, top to bottom.
**Double-column templates** split the page into two zones. Typically, the main column holds your work experience, projects, and summary, while the sidebar column holds skills, education, certifications, and contact details. This layout fits more information onto one page but introduces a non-linear reading path.
| Feature | Single Column | Double Column |
| ----------------- | ----------------------------------------------------- | ------------------------------------------------------------------------- |
| Reading flow | Linear, top to bottom | Split between main content and sidebar |
| ATS compatibility | Highest | Good, but some older ATS parsers may misread column order |
| Best for | Senior roles, executive positions, text-heavy resumes | Design-oriented roles, compact resumes, roles where visual layout matters |
| Content density | Lower per page | Higher per page |
| Page count | May require 2 pages for extensive experience | Often fits on 1 page |
### When Should I Use a Single-Column Template?
Choose a single-column template when:
* You are applying through an Applicant Tracking System and want maximum parsing accuracy
* Your target role is in a traditional industry (finance, consulting, legal, enterprise tech)
* You have extensive work experience that benefits from full-width bullet points
* You want the safest, most universally compatible layout
For maximum ATS compatibility, use a single-column template. Multi-column layouts can confuse some tracking systems, and text embedded in sidebars may be parsed out of order or silently dropped.
### Can I Switch Templates After Creating a Resume?
Yes. You can switch templates at any time without losing content. When you select a new template from the panel, your text, sections, and formatting are automatically reflowed into the new layout. No data is deleted or overwritten.
Click the **Templates** tab in the top toolbar.
Use the **All**, **Single Column**, or **Double Column** tabs to filter. Scroll through the available designs.
Click on any template thumbnail to apply it immediately. Your resume content is reformatted into the new layout.
Check the live preview in the left panel. If you are not satisfied, click a different template or use **Undo** to revert.
***
## Sections Management
Sections are the building blocks of your resume. The Sections panel lets you control which sections appear, what order they are in, and whether to add new ones.
Click the **Sections** tab in the top toolbar to open the sections panel.
### What Resume Templates Are Available?
NxtJob offers **12 professionally designed templates** organized into two categories:
| Category | Count | Description |
| ----------------- | ----- | --------------------------------------------------------------------------------------------------- |
| **Single Column** | 7 | Content flows in one column from top to bottom. Clean, linear reading order. |
| **Double Column** | 5 | Content is split into two columns, typically with a sidebar for skills, contact info, or education. |
You can browse all 12 at once using the **All** tab, or filter by **Single Column** or **Double Column** using the tabs at the top of the templates panel.
### What Is the Difference Between Single-Column and Double-Column Templates?
**Single-column templates** present your resume content in a single, top-to-bottom flow. Every section occupies the full width of the page. This creates a straightforward reading experience that mirrors how most people scan documents: left to right, top to bottom.
**Double-column templates** split the page into two zones. Typically, the main column holds your work experience, projects, and summary, while the sidebar column holds skills, education, certifications, and contact details. This layout fits more information onto one page but introduces a non-linear reading path.
| Feature | Single Column | Double Column |
| ----------------- | ----------------------------------------------------- | ------------------------------------------------------------------------- |
| Reading flow | Linear, top to bottom | Split between main content and sidebar |
| ATS compatibility | Highest | Good, but some older ATS parsers may misread column order |
| Best for | Senior roles, executive positions, text-heavy resumes | Design-oriented roles, compact resumes, roles where visual layout matters |
| Content density | Lower per page | Higher per page |
| Page count | May require 2 pages for extensive experience | Often fits on 1 page |
### When Should I Use a Single-Column Template?
Choose a single-column template when:
* You are applying through an Applicant Tracking System and want maximum parsing accuracy
* Your target role is in a traditional industry (finance, consulting, legal, enterprise tech)
* You have extensive work experience that benefits from full-width bullet points
* You want the safest, most universally compatible layout
For maximum ATS compatibility, use a single-column template. Multi-column layouts can confuse some tracking systems, and text embedded in sidebars may be parsed out of order or silently dropped.
### Can I Switch Templates After Creating a Resume?
Yes. You can switch templates at any time without losing content. When you select a new template from the panel, your text, sections, and formatting are automatically reflowed into the new layout. No data is deleted or overwritten.
Click the **Templates** tab in the top toolbar.
Use the **All**, **Single Column**, or **Double Column** tabs to filter. Scroll through the available designs.
Click on any template thumbnail to apply it immediately. Your resume content is reformatted into the new layout.
Check the live preview in the left panel. If you are not satisfied, click a different template or use **Undo** to revert.
***
## Sections Management
Sections are the building blocks of your resume. The Sections panel lets you control which sections appear, what order they are in, and whether to add new ones.
Click the **Sections** tab in the top toolbar to open the sections panel.
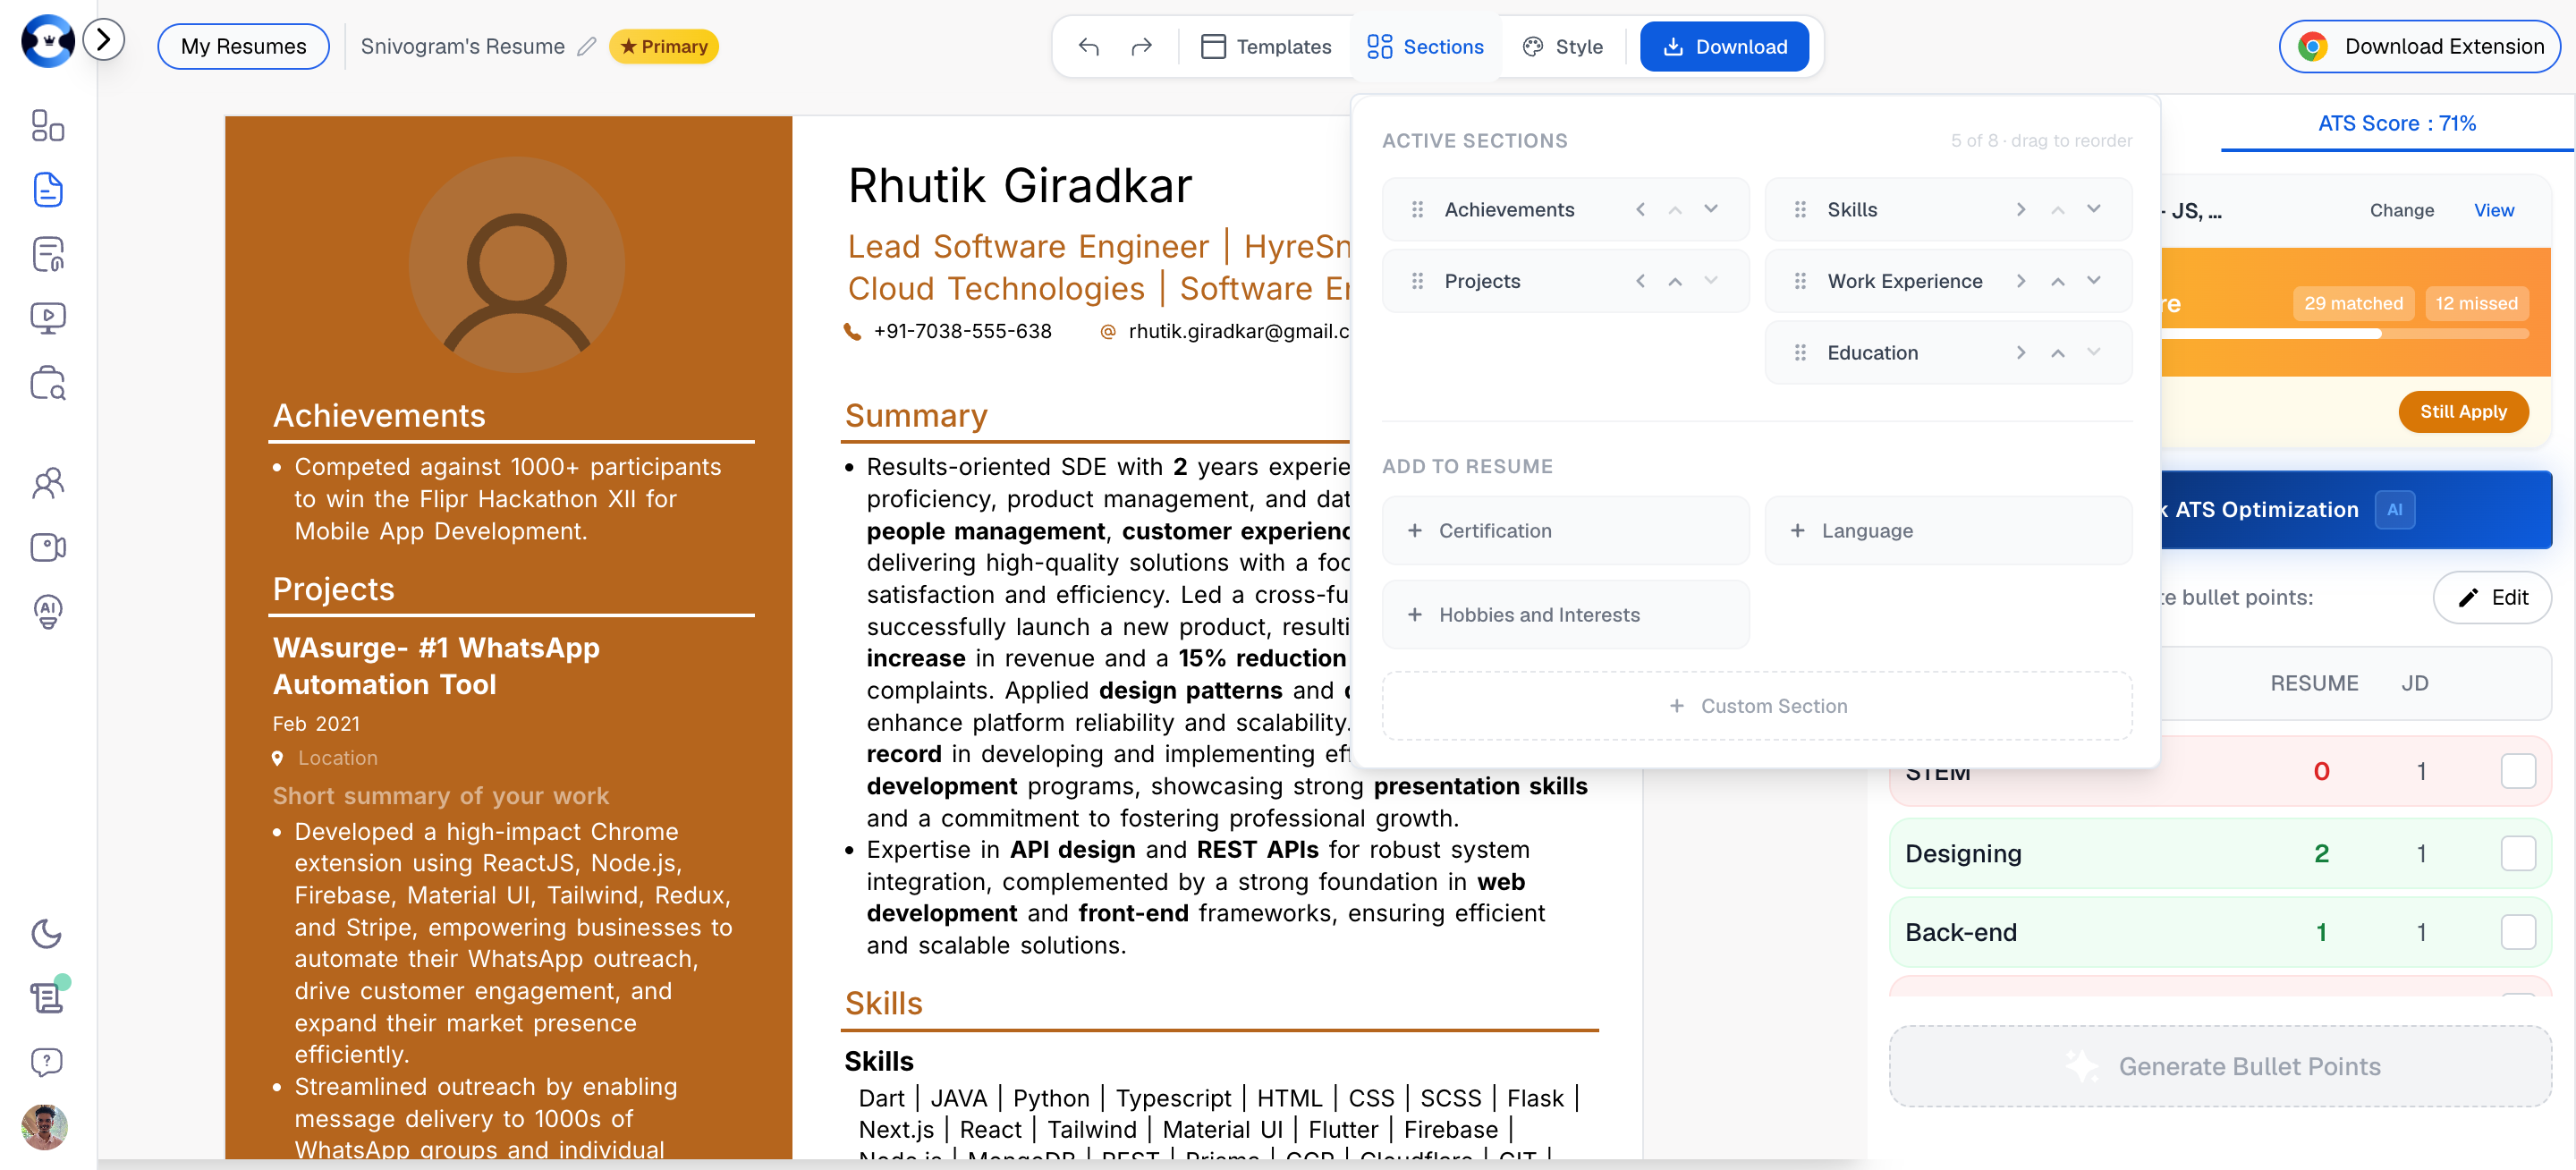 The panel is divided into two areas:
* **Active Sections** -- The sections currently visible on your resume, listed in their display order.
* **Add to Resume** -- A list of available sections you can add with a single click.
### How to Add a New Section
Click the **Sections** tab in the top toolbar.
In the **Add to Resume** area, browse the available sections. Options typically include Summary, Skills, Work Experience, Projects, Education, Certifications, Achievements, Languages, and Custom Sections.
Click on the section name. It is added to your resume and appears in the **Active Sections** list.
The new section appears in the resume editor on the left. Click into it to begin adding your content.
### How to Rearrange Resume Sections
The order of sections on your resume matters. Recruiters spend an average of six seconds on an initial resume scan, so your strongest content should appear first.
Click the **Sections** tab in the top toolbar.
In the **Active Sections** list, drag any section up or down to change its position. Alternatively, use the **Move Up** and **Move Down** arrow buttons available on each section in the editor.
Check the resume preview on the left to confirm the new order looks correct.
For most senior professionals, the optimal section order is: Personal Details, Summary, Skills, Work Experience, Projects, Education, and then Certifications. Lead with your summary and skills to make an immediate impact during that critical six-second scan.
### Can I Remove or Hide a Section?
Yes. You can remove a section from your resume using the **Delete** button that appears on each section in the editor. Removing a section takes it out of your resume but does not permanently delete the content -- you can re-add it later from the Sections panel.
You can also hide individual fields within a section using **Display Settings** (covered below), which lets you keep data stored but not visible on the final document.
### Does Section Order Affect Resume Score or ATS Score?
Section order does not directly change your Resume Score or ATS Score calculations. Both scores evaluate the content and formatting of your resume regardless of which section comes first.
However, section order has a practical impact on how recruiters and hiring managers read your resume. The Resume Score playbook recommends placing your most relevant and impressive content near the top of the document, which indirectly supports better outcomes even though the score formula itself is order-agnostic.
***
## Style (Fonts and Colors)
The Style panel gives you control over the visual presentation of your resume. You can adjust typography, spacing, and colors to match your personal brand or the expectations of your target industry.
Click the **Style** tab in the top toolbar to open the style panel.
The panel is divided into two areas:
* **Active Sections** -- The sections currently visible on your resume, listed in their display order.
* **Add to Resume** -- A list of available sections you can add with a single click.
### How to Add a New Section
Click the **Sections** tab in the top toolbar.
In the **Add to Resume** area, browse the available sections. Options typically include Summary, Skills, Work Experience, Projects, Education, Certifications, Achievements, Languages, and Custom Sections.
Click on the section name. It is added to your resume and appears in the **Active Sections** list.
The new section appears in the resume editor on the left. Click into it to begin adding your content.
### How to Rearrange Resume Sections
The order of sections on your resume matters. Recruiters spend an average of six seconds on an initial resume scan, so your strongest content should appear first.
Click the **Sections** tab in the top toolbar.
In the **Active Sections** list, drag any section up or down to change its position. Alternatively, use the **Move Up** and **Move Down** arrow buttons available on each section in the editor.
Check the resume preview on the left to confirm the new order looks correct.
For most senior professionals, the optimal section order is: Personal Details, Summary, Skills, Work Experience, Projects, Education, and then Certifications. Lead with your summary and skills to make an immediate impact during that critical six-second scan.
### Can I Remove or Hide a Section?
Yes. You can remove a section from your resume using the **Delete** button that appears on each section in the editor. Removing a section takes it out of your resume but does not permanently delete the content -- you can re-add it later from the Sections panel.
You can also hide individual fields within a section using **Display Settings** (covered below), which lets you keep data stored but not visible on the final document.
### Does Section Order Affect Resume Score or ATS Score?
Section order does not directly change your Resume Score or ATS Score calculations. Both scores evaluate the content and formatting of your resume regardless of which section comes first.
However, section order has a practical impact on how recruiters and hiring managers read your resume. The Resume Score playbook recommends placing your most relevant and impressive content near the top of the document, which indirectly supports better outcomes even though the score formula itself is order-agnostic.
***
## Style (Fonts and Colors)
The Style panel gives you control over the visual presentation of your resume. You can adjust typography, spacing, and colors to match your personal brand or the expectations of your target industry.
Click the **Style** tab in the top toolbar to open the style panel.
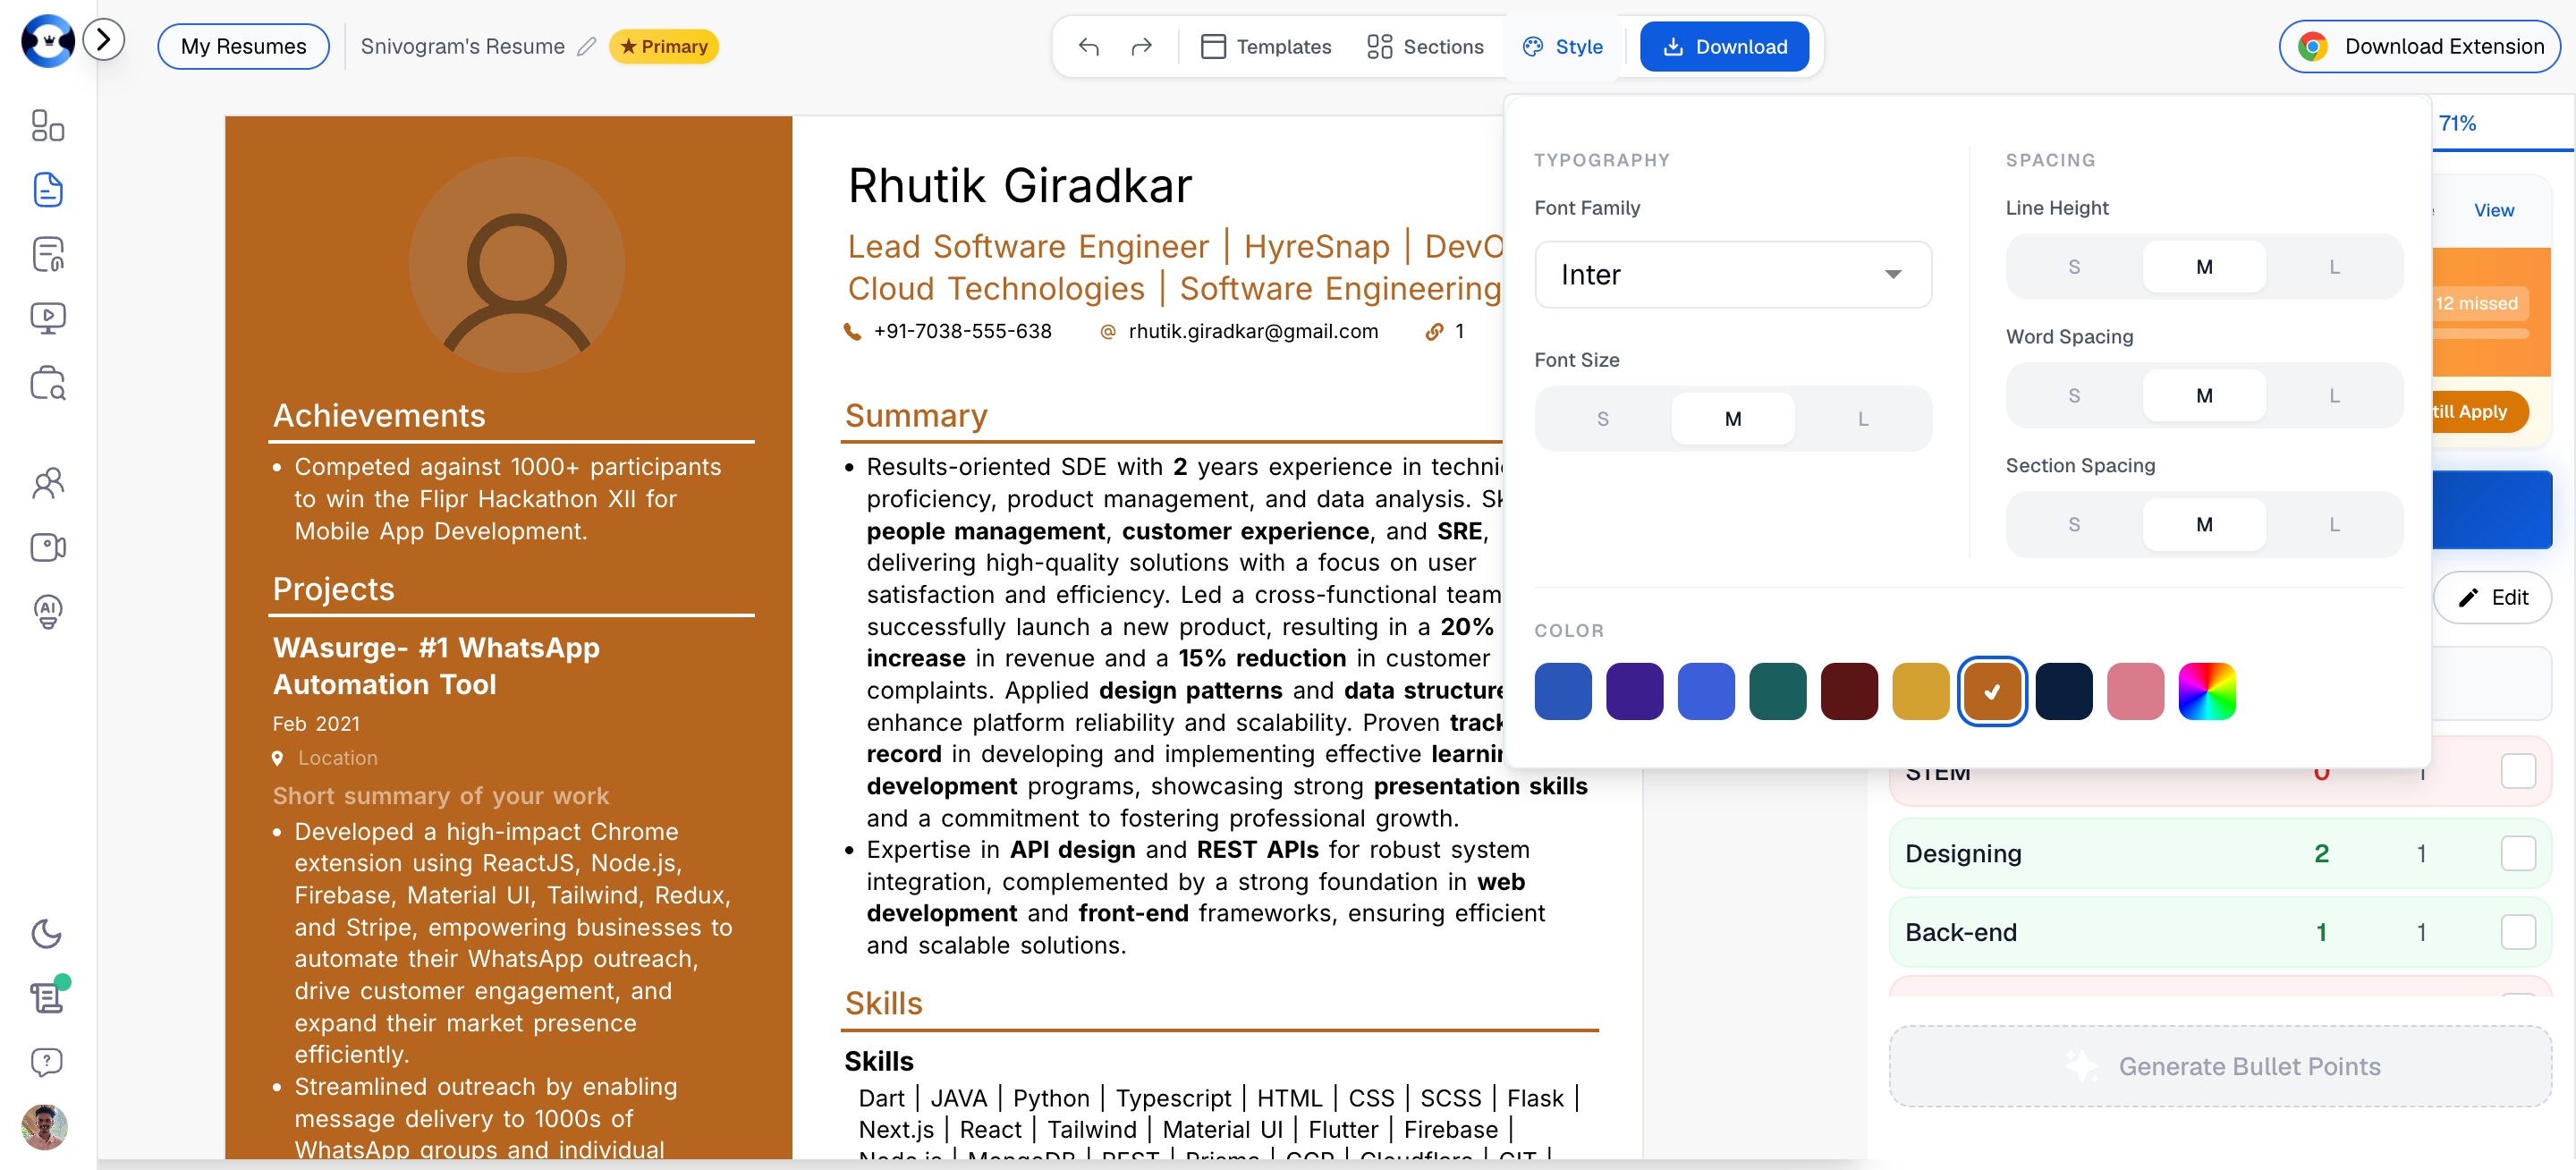
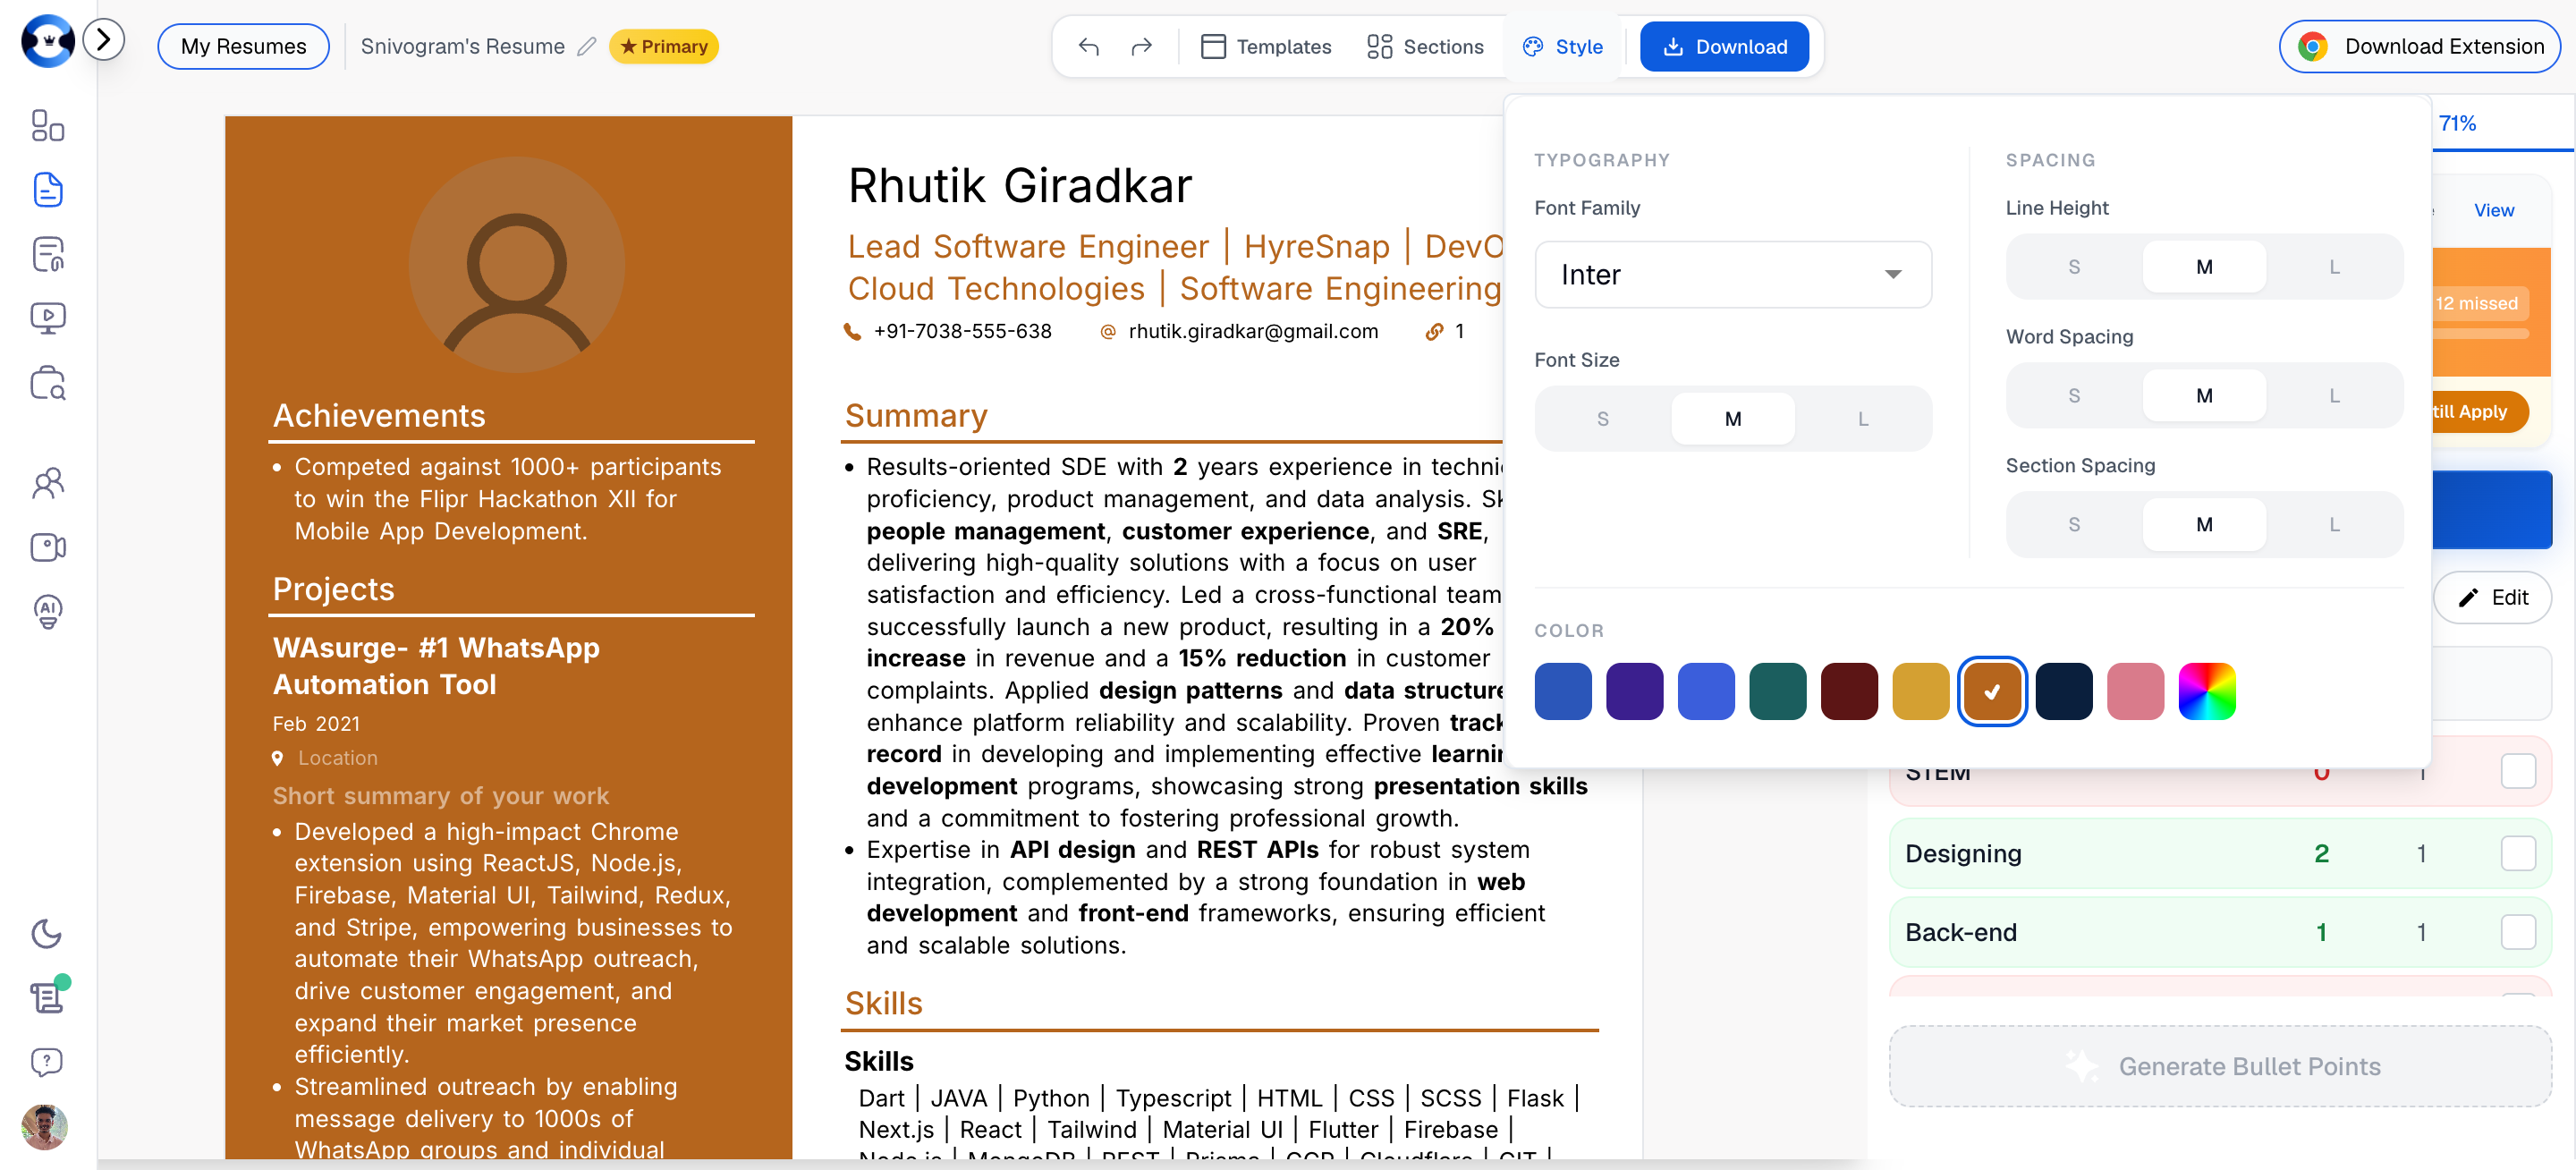 The style panel is organized into three areas:
| Area | Controls |
| -------------- | --------------------------------------------------------------------------------- |
| **Typography** | Font Family (dropdown selector) and Font Size (S, M, L toggle) |
| **Spacing** | Line Height (S, M, L), Word Spacing (S, M, L), Section Spacing (S, M, L) |
| **Color** | A row of color swatches for accent colors used in headings, lines, and highlights |
### How to Change Font Style
Click the **Style** tab in the top toolbar.
Under **Typography**, click the **Font Family** dropdown. Browse the available professional typefaces and select the one you want. The default is **Inter**.
Click **S** (small), **M** (medium), or **L** (large) under the **Font Size** toggle. The change is applied immediately to your resume preview.
Fine-tune the look with the **Line Height**, **Word Spacing**, and **Section Spacing** toggles. Each offers S, M, and L options.
Stick with clean, professional fonts for most applications. Sans-serif fonts like Inter, Roboto, and Open Sans render well on screens and parse cleanly through ATS systems. Save decorative or serif fonts for creative industry resumes where visual flair is expected.
### How to Change Resume Colors
Click the **Style** tab in the top toolbar.
Under the **Color** section, click any color swatch. The selected color is applied to accent elements across your resume, including section headings, divider lines, and highlights.
Check the resume preview on the left to see how the new color looks with your chosen template and font.
Subtle, professional colors (navy, dark teal, charcoal) work best for most industries. Bright or saturated colors can be distracting on-screen and may not print well. If in doubt, stick with the default color palette provided by NxtJob.
***
## Download Option
The Download button in the top toolbar lets you export and share your resume. You can download a PDF file or generate a shareable link.
### How to Download My Resume
Make sure all your content, formatting, and template choices are finalized in the builder.
Click the **Download** button in the top toolbar.
Select from the available download and sharing options (described below).
### What Download Options Are Available?
| Option | Description |
| ------------------- | -------------------------------------------------------------------------------------------------------------------------------------------------------------- |
| **Download as PDF** | Exports your resume as a PDF file to your local device. The PDF preserves all formatting, fonts, colors, and layout exactly as displayed in the builder. |
| **Share via Link** | Generates a public URL you can send to recruiters, hiring managers, or include on portfolio pages. The link opens a clean, read-only rendering of your resume. |
### How to Download Resume as PDF
Click the **Download** button in the top toolbar.
Choose the PDF download option. Your browser will download the file to your default downloads folder.
Open the downloaded PDF and verify that all content, formatting, and layout match what you see in the builder preview.
Always download and review the PDF before submitting an application. Certain fonts or complex layouts may render slightly differently in PDF format. A quick visual check takes 30 seconds and can catch issues that cost you an interview.
### How to Share My Resume Using a Link
Click the **Download** button in the top toolbar.
Choose the **Share via Link** option. NxtJob generates a unique URL for your resume.
Copy the generated URL to your clipboard.
Paste the link in an email, LinkedIn message, or portfolio page. Anyone with the link can view a clean, read-only version of your resume.
Sharing a link instead of a PDF attachment can be useful when emailing recruiters. The link always shows the latest version of your resume, so if you make updates after sharing, the recipient sees the updated version automatically.
***
## Section Display Settings
Every section in the builder includes a **Settings** button (gear icon) that opens display settings for that section. Display settings let you control which fields within a section are visible on your resume without deleting the underlying data.
### What Are Display Settings?
Display settings are toggles that control the visibility of individual fields within a resume section. For example, the Work Experience section may have fields for job title, company name, dates, location, and bullet points. Display settings let you show or hide any of these fields independently.
This is useful when you want to keep information stored in your resume (for future use or other variants) without displaying it on the current version.
### How to Show or Hide Fields in a Section
Find the section in the resume editor on the left side of the builder.
Click the **Settings** (gear icon) button on the section. A panel or dropdown appears showing all available fields for that section.
Use the toggles to show or hide individual fields. Hidden fields are removed from the visible resume but their data is retained.
Close the settings panel. The resume preview updates immediately to reflect your changes.
### Can Hidden Fields Be Restored Later?
Yes. Hidden fields are not deleted -- they are simply not displayed. You can return to the section's display settings at any time and toggle a hidden field back to visible. Your data will reappear exactly as it was before you hid it.
This makes display settings a safe way to experiment with different resume layouts. You can hide a field for one application and show it for another without retyping anything.
Use display settings strategically when tailoring your resume for different roles. For example, you might hide your GPA in the Education section for senior-level applications where years of experience matter more, but show it for roles at companies that specifically request it.
***
## Section Action Buttons
Every section in the builder has a set of action buttons that appear when you hover over or select the section:
| Button | Function |
| ----------------------- | ------------------------------------------------------------------------------ |
| **AI Generate** | Uses NxtJob's AI to auto-generate or enhance content for that section. |
| **Move Up / Move Down** | Reorders the section relative to others on the resume. |
| **Settings** | Opens section-specific display settings (field visibility and layout options). |
| **Delete** | Removes the section from the resume. |
Use **AI Generate** on your Summary and Work Experience sections first. The AI produces strong initial drafts using the CAR framework (Challenge, Action, Result) that you can then refine with your personal voice and specific numbers.
The style panel is organized into three areas:
| Area | Controls |
| -------------- | --------------------------------------------------------------------------------- |
| **Typography** | Font Family (dropdown selector) and Font Size (S, M, L toggle) |
| **Spacing** | Line Height (S, M, L), Word Spacing (S, M, L), Section Spacing (S, M, L) |
| **Color** | A row of color swatches for accent colors used in headings, lines, and highlights |
### How to Change Font Style
Click the **Style** tab in the top toolbar.
Under **Typography**, click the **Font Family** dropdown. Browse the available professional typefaces and select the one you want. The default is **Inter**.
Click **S** (small), **M** (medium), or **L** (large) under the **Font Size** toggle. The change is applied immediately to your resume preview.
Fine-tune the look with the **Line Height**, **Word Spacing**, and **Section Spacing** toggles. Each offers S, M, and L options.
Stick with clean, professional fonts for most applications. Sans-serif fonts like Inter, Roboto, and Open Sans render well on screens and parse cleanly through ATS systems. Save decorative or serif fonts for creative industry resumes where visual flair is expected.
### How to Change Resume Colors
Click the **Style** tab in the top toolbar.
Under the **Color** section, click any color swatch. The selected color is applied to accent elements across your resume, including section headings, divider lines, and highlights.
Check the resume preview on the left to see how the new color looks with your chosen template and font.
Subtle, professional colors (navy, dark teal, charcoal) work best for most industries. Bright or saturated colors can be distracting on-screen and may not print well. If in doubt, stick with the default color palette provided by NxtJob.
***
## Download Option
The Download button in the top toolbar lets you export and share your resume. You can download a PDF file or generate a shareable link.
### How to Download My Resume
Make sure all your content, formatting, and template choices are finalized in the builder.
Click the **Download** button in the top toolbar.
Select from the available download and sharing options (described below).
### What Download Options Are Available?
| Option | Description |
| ------------------- | -------------------------------------------------------------------------------------------------------------------------------------------------------------- |
| **Download as PDF** | Exports your resume as a PDF file to your local device. The PDF preserves all formatting, fonts, colors, and layout exactly as displayed in the builder. |
| **Share via Link** | Generates a public URL you can send to recruiters, hiring managers, or include on portfolio pages. The link opens a clean, read-only rendering of your resume. |
### How to Download Resume as PDF
Click the **Download** button in the top toolbar.
Choose the PDF download option. Your browser will download the file to your default downloads folder.
Open the downloaded PDF and verify that all content, formatting, and layout match what you see in the builder preview.
Always download and review the PDF before submitting an application. Certain fonts or complex layouts may render slightly differently in PDF format. A quick visual check takes 30 seconds and can catch issues that cost you an interview.
### How to Share My Resume Using a Link
Click the **Download** button in the top toolbar.
Choose the **Share via Link** option. NxtJob generates a unique URL for your resume.
Copy the generated URL to your clipboard.
Paste the link in an email, LinkedIn message, or portfolio page. Anyone with the link can view a clean, read-only version of your resume.
Sharing a link instead of a PDF attachment can be useful when emailing recruiters. The link always shows the latest version of your resume, so if you make updates after sharing, the recipient sees the updated version automatically.
***
## Section Display Settings
Every section in the builder includes a **Settings** button (gear icon) that opens display settings for that section. Display settings let you control which fields within a section are visible on your resume without deleting the underlying data.
### What Are Display Settings?
Display settings are toggles that control the visibility of individual fields within a resume section. For example, the Work Experience section may have fields for job title, company name, dates, location, and bullet points. Display settings let you show or hide any of these fields independently.
This is useful when you want to keep information stored in your resume (for future use or other variants) without displaying it on the current version.
### How to Show or Hide Fields in a Section
Find the section in the resume editor on the left side of the builder.
Click the **Settings** (gear icon) button on the section. A panel or dropdown appears showing all available fields for that section.
Use the toggles to show or hide individual fields. Hidden fields are removed from the visible resume but their data is retained.
Close the settings panel. The resume preview updates immediately to reflect your changes.
### Can Hidden Fields Be Restored Later?
Yes. Hidden fields are not deleted -- they are simply not displayed. You can return to the section's display settings at any time and toggle a hidden field back to visible. Your data will reappear exactly as it was before you hid it.
This makes display settings a safe way to experiment with different resume layouts. You can hide a field for one application and show it for another without retyping anything.
Use display settings strategically when tailoring your resume for different roles. For example, you might hide your GPA in the Education section for senior-level applications where years of experience matter more, but show it for roles at companies that specifically request it.
***
## Section Action Buttons
Every section in the builder has a set of action buttons that appear when you hover over or select the section:
| Button | Function |
| ----------------------- | ------------------------------------------------------------------------------ |
| **AI Generate** | Uses NxtJob's AI to auto-generate or enhance content for that section. |
| **Move Up / Move Down** | Reorders the section relative to others on the resume. |
| **Settings** | Opens section-specific display settings (field visibility and layout options). |
| **Delete** | Removes the section from the resume. |
Use **AI Generate** on your Summary and Work Experience sections first. The AI produces strong initial drafts using the CAR framework (Challenge, Action, Result) that you can then refine with your personal voice and specific numbers.