> ## Documentation Index
> Fetch the complete documentation index at: https://docs.nxtjob.ai/llms.txt
> Use this file to discover all available pages before exploring further.
# Section-Level Actions
> Add, edit, reorder, and manage Work Experience, Projects, and other resume sections
Every resume section in the NxtJob builder has a consistent set of actions for adding, editing, reordering, and removing content. This guide covers section-level operations with particular depth on **Work Experience** and **Projects** — the two sections where most editing happens.
## Common Section Actions
All sections share these standard action buttons in the builder:
| Button | Function |
| ----------------------- | --------------------------------------------------------------------- |
| **AI Generate** | Uses NxtJob's AI to auto-generate or enhance content for that section |
| **Move Up / Move Down** | Reorders the section relative to others on the resume |
| **Settings** | Opens section-specific configuration (visibility, display options) |
| **Delete** | Removes the section from the resume entirely |
| **Add** | Adds a new entry within the section (new job, new project, etc.) |
 ## Work Experience Section
The Work Experience section is typically the largest and most important part of your resume. It directly impacts your Resume Score through multiple rules: quantification, action verbs, bold highlighting, bullet count, and more.
### How to Add a New Work Experience
Scroll to the Work Experience section in the builder editor.
Click the **+ Add** button at the bottom of the Work Experience section. A new empty entry appears.
Enter the required fields: **Job Title**, **Company Name**, **Start Date**, **End Date** (or check "Present" for current role), and **Location**.
Click into the bullet point area and start typing your accomplishments. Each bullet should begin with an action verb and include quantified results.
Click **AI Generate** to have the AI create initial bullet points based on your job title and company. Edit the generated content to add your specific numbers.
### How to Add Multiple Roles Under the Same Company
If you held multiple positions at the same company (e.g., promoted from Senior Engineer to Engineering Manager), you have two approaches:
**Approach 1: Separate Entries (Recommended)**
Create a separate Work Experience entry for each role at the same company. This clearly shows career progression and allows each role to have its own bullet points, dates, and title.
| Field | Entry 1 | Entry 2 |
| ----------- | -------------------------- | ------------------------------ |
| **Title** | Engineering Manager | Senior Software Engineer |
| **Company** | Acme Corp | Acme Corp |
| **Dates** | Jan 2024 - Present | Mar 2021 - Dec 2023 |
| **Bullets** | Leadership-focused bullets | Technical contribution bullets |
**Approach 2: Single Entry with Multiple Roles**
Use one Work Experience entry with the company name, and list your roles chronologically within the bullet points. This saves space but provides less visual clarity.
For senior professionals, Approach 1 (separate entries) is almost always better. It gives each role its own scoring metrics, allows more detailed bullet points per role, and clearly demonstrates career progression to recruiters.
### How to Edit an Existing Role
Click on any field within the Work Experience entry you want to edit.
Edit the job title, company name, dates, location, or bullet points directly. All fields are inline-editable.
Click on any bullet to edit its text. Use the formatting toolbar to add **bold** highlighting to key metrics and achievements.
Press **Enter** at the end of a bullet to add a new one. Delete the text and press **Backspace** to remove an empty bullet.
### How to Reorder Work Experiences
Your Work Experience entries should be in **reverse chronological order** (most recent first). The Resume Score specifically checks for this and will flag entries that are out of order.
Each Work Experience entry has **Move Up** and **Move Down** arrow buttons.
Click the appropriate arrow to shift the entry one position up or down in the list.
Ensure your most recent role appears first. Check the Resume Score to confirm the "Reverse Chronological Order" rule passes.
### How to Delete a Work Experience
Find the Work Experience entry you want to remove.
Click the **Delete** button (trash icon) on the entry.
Confirm the deletion when prompted. The entry and all its bullet points are removed permanently.
Before deleting a Work Experience entry, consider whether you should keep it with minimal bullet points instead. The Resume Score's "Number of Sections" and "Critical Sections Present" rules require Work Experience to exist. Even old roles with 1-2 bullet points contribute to your career narrative.
### Work Experience Display Settings
Each Work Experience entry has display settings that control what information is visible on the final resume:
| Setting | What It Controls |
| ---------------------- | ----------------------------------------------------------------------------------- |
| **Show/Hide Location** | Toggle whether the job location appears on the resume |
| **Show/Hide Dates** | Toggle whether start and end dates appear |
| **Date Format** | Choose between different date formats (e.g., "Jan 2024", "January 2024", "01/2024") |
Access display settings by clicking the **Settings** (gear) icon on the Work Experience entry.
## Projects Section
The Projects section follows the same structure as Work Experience and is scored using identical rules. It is particularly valuable for senior professionals who want to highlight strategic initiatives, open source contributions, or cross-functional projects.
### How to Add a New Project
Scroll to the Projects section in the builder. If you do not see it, add it from the **Sections** menu in the top toolbar.
Click the **+ Add** button at the bottom of the Projects section.
Enter the **Project Name**, **Dates**, and optionally a **URL** or **Link** to the project.
Add accomplishment bullets following the same CAR framework used for Work Experience: Action verb + what you did + measurable result.
### How to Reorder Projects
Each project entry has **Move Up** and **Move Down** arrow buttons.
Unlike Work Experience (which must be reverse chronological), Projects can be ordered by impact. Put your most impressive project first.
### How to Delete a Project
Find the project entry you want to remove.
Click the **Delete** button (trash icon) on the entry.
Confirm when prompted. The project and all its bullet points are removed permanently.
### Projects Display Settings
Similar to Work Experience, each project entry has display settings:
| Setting | What It Controls |
| ------------------- | ---------------------------------------------------- |
| **Show/Hide Dates** | Toggle whether project dates appear |
| **Show/Hide Link** | Toggle whether the project URL appears on the resume |
| **Date Format** | Choose the date format for display |
Access these by clicking the **Settings** (gear) icon on the project entry.
Include 2-4 projects that demonstrate leadership, architecture decisions, or measurable business impact. For senior professionals, focus on initiatives you drove at scale within organizations rather than personal side projects.
## Education Section
### How to Add Education
Scroll to the Education section, or add it from the **Sections** menu.
Click **+ Add** to create a new entry.
Enter: **Degree Type** (B.S., M.S., MBA, Ph.D., etc.), **Field of Study**, **Institution Name**, **Graduation Date**, and **Location**.
### Education Display Settings
| Setting | What It Controls |
| ---------------------- | ---------------------------------------------------------- |
| **Show/Hide GPA** | Toggle GPA visibility (hide if below 3.5 for senior roles) |
| **Show/Hide Dates** | Toggle graduation date visibility |
| **Show/Hide Location** | Toggle institution location |
## Certifications Section
### How to Add a Certification
Scroll to the Certifications section, or add it from the **Sections** menu.
Click **+ Add** to create a new entry.
Enter: **Certification Name**, **Issuing Organization**, **Date Earned**, and optionally a **Verification URL**.
## Languages Section
### How to Add a Language
Scroll to the Languages section, or add it from the **Sections** menu.
Click **+ Add** to create a new entry.
Enter the **Language Name** and select a **Proficiency Level**: Native, Fluent, Conversational, or Basic.
## Adding and Removing Sections
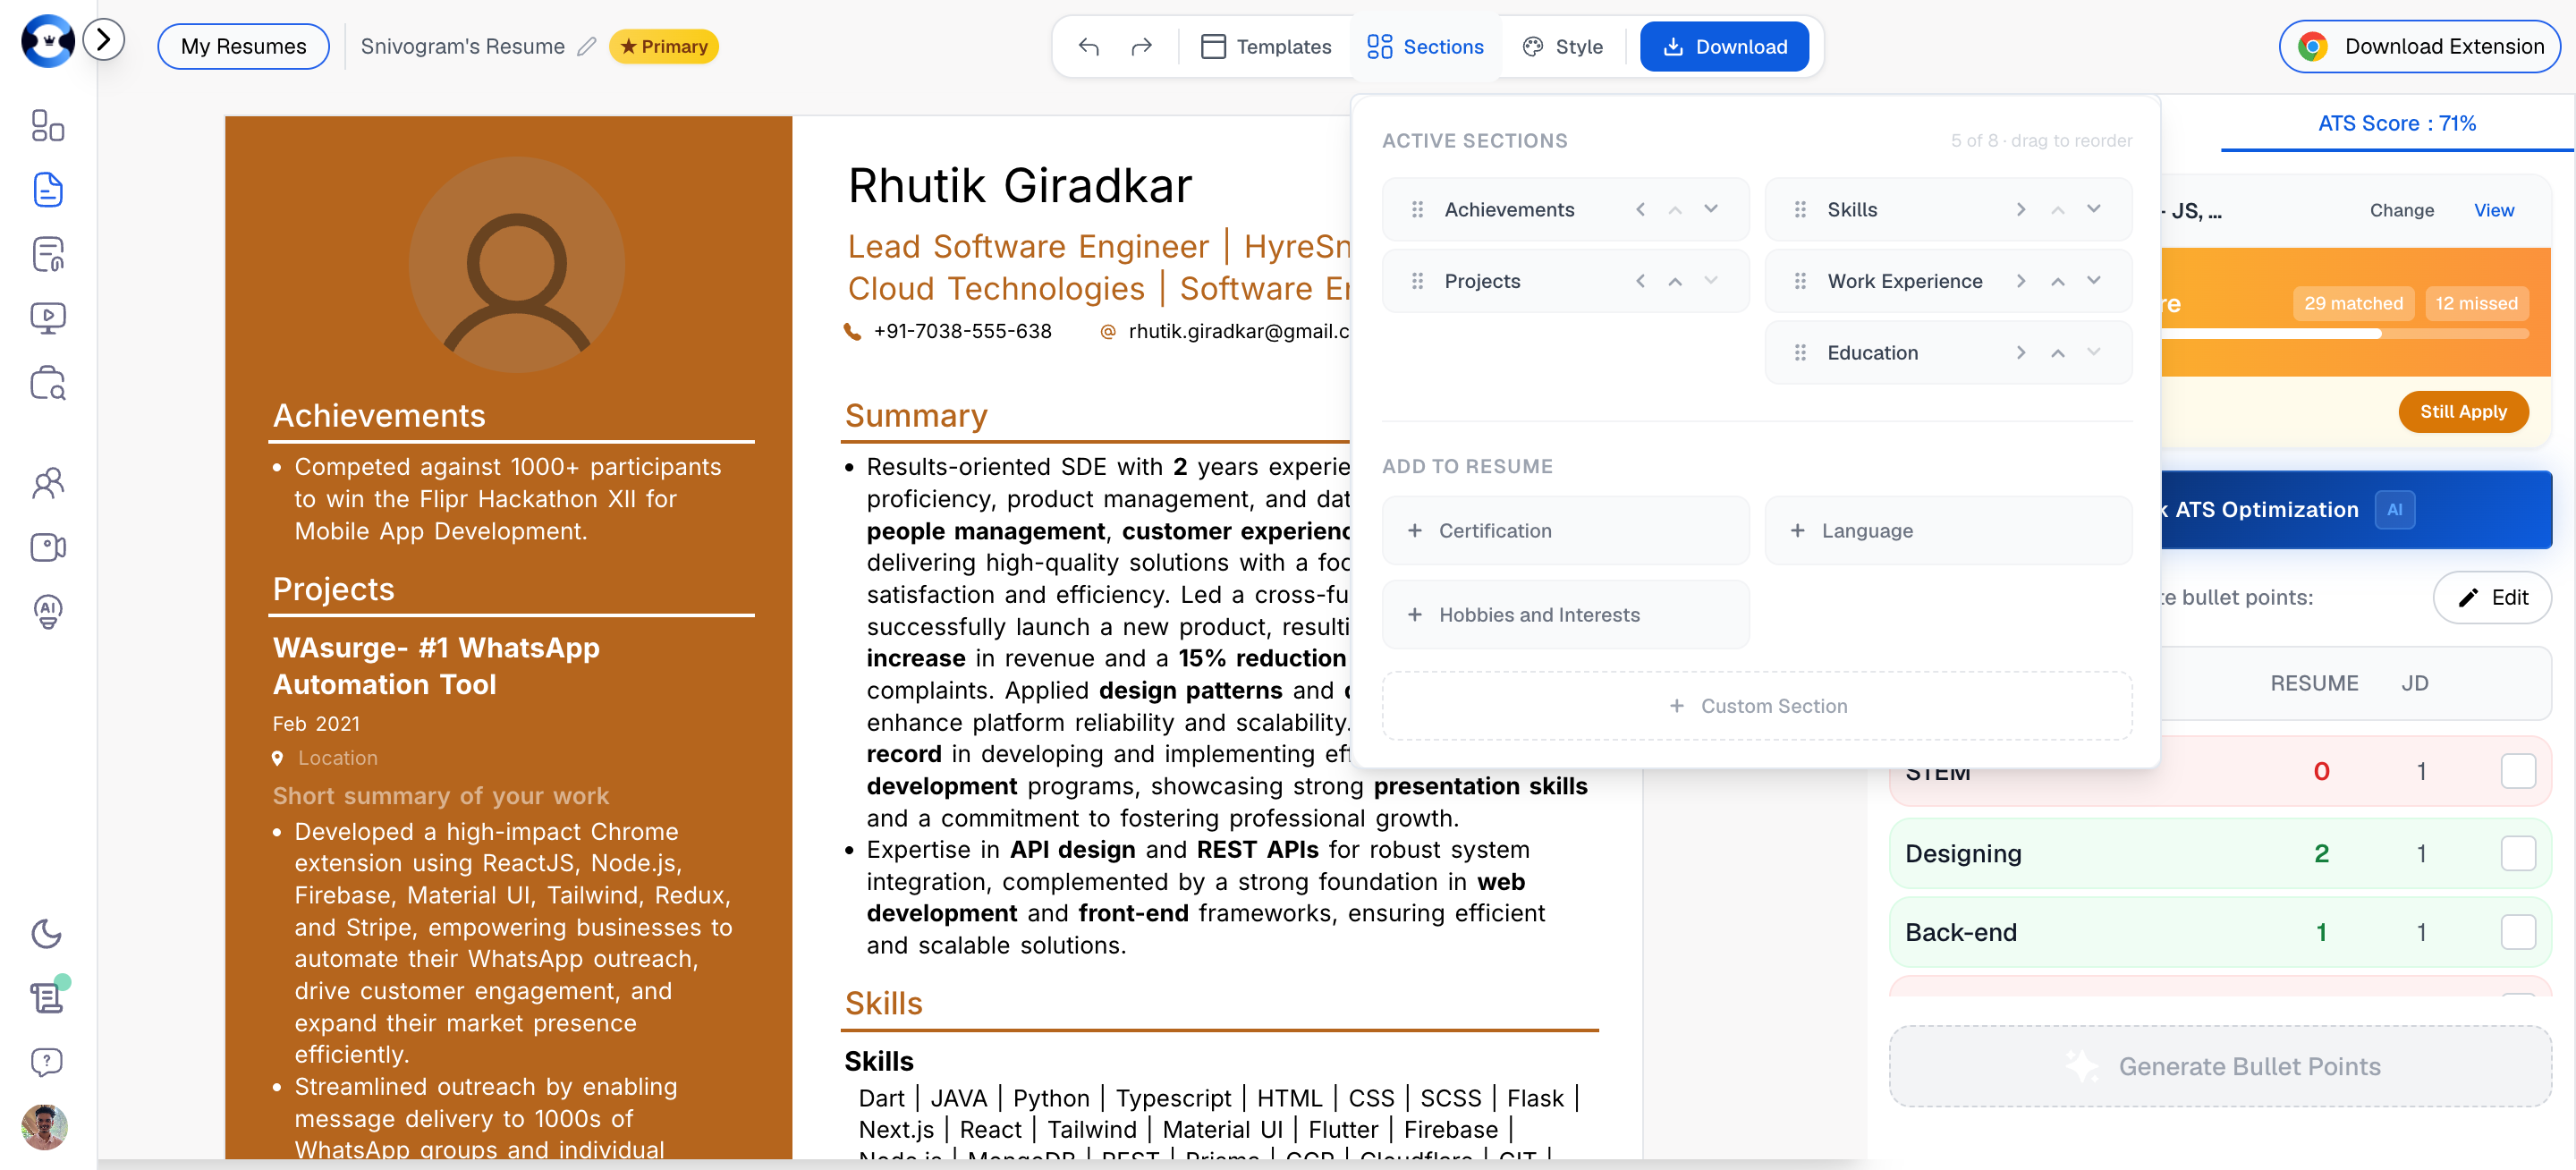
### How to Add a Section to Your Resume
Click the **Sections** button in the top toolbar.
The panel shows **Active Sections** (currently on your resume) and sections available to add: Certification, Language, Hobbies and Interests, and Custom Section.
Click the **+** button next to any available section to add it to your resume.
### How to Remove a Section
Click the **Sections** button in the top toolbar.
Click the **remove** button next to the section you want to hide. The section data is preserved but hidden from the resume output.
### How to Rearrange Sections
Click the **Sections** button in the top toolbar.
Use the **drag handles** (six-dot icon) on each active section to drag it to a new position. Alternatively, use the **up/down arrows** to move sections one position at a time.
Check your Resume Score — the scoring engine checks that Skills is the 3rd section and Education is near the end for experienced professionals.
The recommended section order for senior professionals is: Personal Details, Summary, Skills, Work Experience, Projects, Education, Certifications, Languages. This puts your strongest selling points first and follows the pattern that recruiters and ATS systems expect.
## Work Experience Section
The Work Experience section is typically the largest and most important part of your resume. It directly impacts your Resume Score through multiple rules: quantification, action verbs, bold highlighting, bullet count, and more.
### How to Add a New Work Experience
Scroll to the Work Experience section in the builder editor.
Click the **+ Add** button at the bottom of the Work Experience section. A new empty entry appears.
Enter the required fields: **Job Title**, **Company Name**, **Start Date**, **End Date** (or check "Present" for current role), and **Location**.
Click into the bullet point area and start typing your accomplishments. Each bullet should begin with an action verb and include quantified results.
Click **AI Generate** to have the AI create initial bullet points based on your job title and company. Edit the generated content to add your specific numbers.
### How to Add Multiple Roles Under the Same Company
If you held multiple positions at the same company (e.g., promoted from Senior Engineer to Engineering Manager), you have two approaches:
**Approach 1: Separate Entries (Recommended)**
Create a separate Work Experience entry for each role at the same company. This clearly shows career progression and allows each role to have its own bullet points, dates, and title.
| Field | Entry 1 | Entry 2 |
| ----------- | -------------------------- | ------------------------------ |
| **Title** | Engineering Manager | Senior Software Engineer |
| **Company** | Acme Corp | Acme Corp |
| **Dates** | Jan 2024 - Present | Mar 2021 - Dec 2023 |
| **Bullets** | Leadership-focused bullets | Technical contribution bullets |
**Approach 2: Single Entry with Multiple Roles**
Use one Work Experience entry with the company name, and list your roles chronologically within the bullet points. This saves space but provides less visual clarity.
For senior professionals, Approach 1 (separate entries) is almost always better. It gives each role its own scoring metrics, allows more detailed bullet points per role, and clearly demonstrates career progression to recruiters.
### How to Edit an Existing Role
Click on any field within the Work Experience entry you want to edit.
Edit the job title, company name, dates, location, or bullet points directly. All fields are inline-editable.
Click on any bullet to edit its text. Use the formatting toolbar to add **bold** highlighting to key metrics and achievements.
Press **Enter** at the end of a bullet to add a new one. Delete the text and press **Backspace** to remove an empty bullet.
### How to Reorder Work Experiences
Your Work Experience entries should be in **reverse chronological order** (most recent first). The Resume Score specifically checks for this and will flag entries that are out of order.
Each Work Experience entry has **Move Up** and **Move Down** arrow buttons.
Click the appropriate arrow to shift the entry one position up or down in the list.
Ensure your most recent role appears first. Check the Resume Score to confirm the "Reverse Chronological Order" rule passes.
### How to Delete a Work Experience
Find the Work Experience entry you want to remove.
Click the **Delete** button (trash icon) on the entry.
Confirm the deletion when prompted. The entry and all its bullet points are removed permanently.
Before deleting a Work Experience entry, consider whether you should keep it with minimal bullet points instead. The Resume Score's "Number of Sections" and "Critical Sections Present" rules require Work Experience to exist. Even old roles with 1-2 bullet points contribute to your career narrative.
### Work Experience Display Settings
Each Work Experience entry has display settings that control what information is visible on the final resume:
| Setting | What It Controls |
| ---------------------- | ----------------------------------------------------------------------------------- |
| **Show/Hide Location** | Toggle whether the job location appears on the resume |
| **Show/Hide Dates** | Toggle whether start and end dates appear |
| **Date Format** | Choose between different date formats (e.g., "Jan 2024", "January 2024", "01/2024") |
Access display settings by clicking the **Settings** (gear) icon on the Work Experience entry.
## Projects Section
The Projects section follows the same structure as Work Experience and is scored using identical rules. It is particularly valuable for senior professionals who want to highlight strategic initiatives, open source contributions, or cross-functional projects.
### How to Add a New Project
Scroll to the Projects section in the builder. If you do not see it, add it from the **Sections** menu in the top toolbar.
Click the **+ Add** button at the bottom of the Projects section.
Enter the **Project Name**, **Dates**, and optionally a **URL** or **Link** to the project.
Add accomplishment bullets following the same CAR framework used for Work Experience: Action verb + what you did + measurable result.
### How to Reorder Projects
Each project entry has **Move Up** and **Move Down** arrow buttons.
Unlike Work Experience (which must be reverse chronological), Projects can be ordered by impact. Put your most impressive project first.
### How to Delete a Project
Find the project entry you want to remove.
Click the **Delete** button (trash icon) on the entry.
Confirm when prompted. The project and all its bullet points are removed permanently.
### Projects Display Settings
Similar to Work Experience, each project entry has display settings:
| Setting | What It Controls |
| ------------------- | ---------------------------------------------------- |
| **Show/Hide Dates** | Toggle whether project dates appear |
| **Show/Hide Link** | Toggle whether the project URL appears on the resume |
| **Date Format** | Choose the date format for display |
Access these by clicking the **Settings** (gear) icon on the project entry.
Include 2-4 projects that demonstrate leadership, architecture decisions, or measurable business impact. For senior professionals, focus on initiatives you drove at scale within organizations rather than personal side projects.
## Education Section
### How to Add Education
Scroll to the Education section, or add it from the **Sections** menu.
Click **+ Add** to create a new entry.
Enter: **Degree Type** (B.S., M.S., MBA, Ph.D., etc.), **Field of Study**, **Institution Name**, **Graduation Date**, and **Location**.
### Education Display Settings
| Setting | What It Controls |
| ---------------------- | ---------------------------------------------------------- |
| **Show/Hide GPA** | Toggle GPA visibility (hide if below 3.5 for senior roles) |
| **Show/Hide Dates** | Toggle graduation date visibility |
| **Show/Hide Location** | Toggle institution location |
## Certifications Section
### How to Add a Certification
Scroll to the Certifications section, or add it from the **Sections** menu.
Click **+ Add** to create a new entry.
Enter: **Certification Name**, **Issuing Organization**, **Date Earned**, and optionally a **Verification URL**.
## Languages Section
### How to Add a Language
Scroll to the Languages section, or add it from the **Sections** menu.
Click **+ Add** to create a new entry.
Enter the **Language Name** and select a **Proficiency Level**: Native, Fluent, Conversational, or Basic.
## Adding and Removing Sections
### How to Add a Section to Your Resume
Click the **Sections** button in the top toolbar.
The panel shows **Active Sections** (currently on your resume) and sections available to add: Certification, Language, Hobbies and Interests, and Custom Section.
Click the **+** button next to any available section to add it to your resume.
### How to Remove a Section
Click the **Sections** button in the top toolbar.
Click the **remove** button next to the section you want to hide. The section data is preserved but hidden from the resume output.
### How to Rearrange Sections
Click the **Sections** button in the top toolbar.
Use the **drag handles** (six-dot icon) on each active section to drag it to a new position. Alternatively, use the **up/down arrows** to move sections one position at a time.
Check your Resume Score — the scoring engine checks that Skills is the 3rd section and Education is near the end for experienced professionals.
The recommended section order for senior professionals is: Personal Details, Summary, Skills, Work Experience, Projects, Education, Certifications, Languages. This puts your strongest selling points first and follows the pattern that recruiters and ATS systems expect.